- GUID Partition Table (GPT)
- UEFI
- luks
- Ventoy
- USB drive with 32+ GB of space
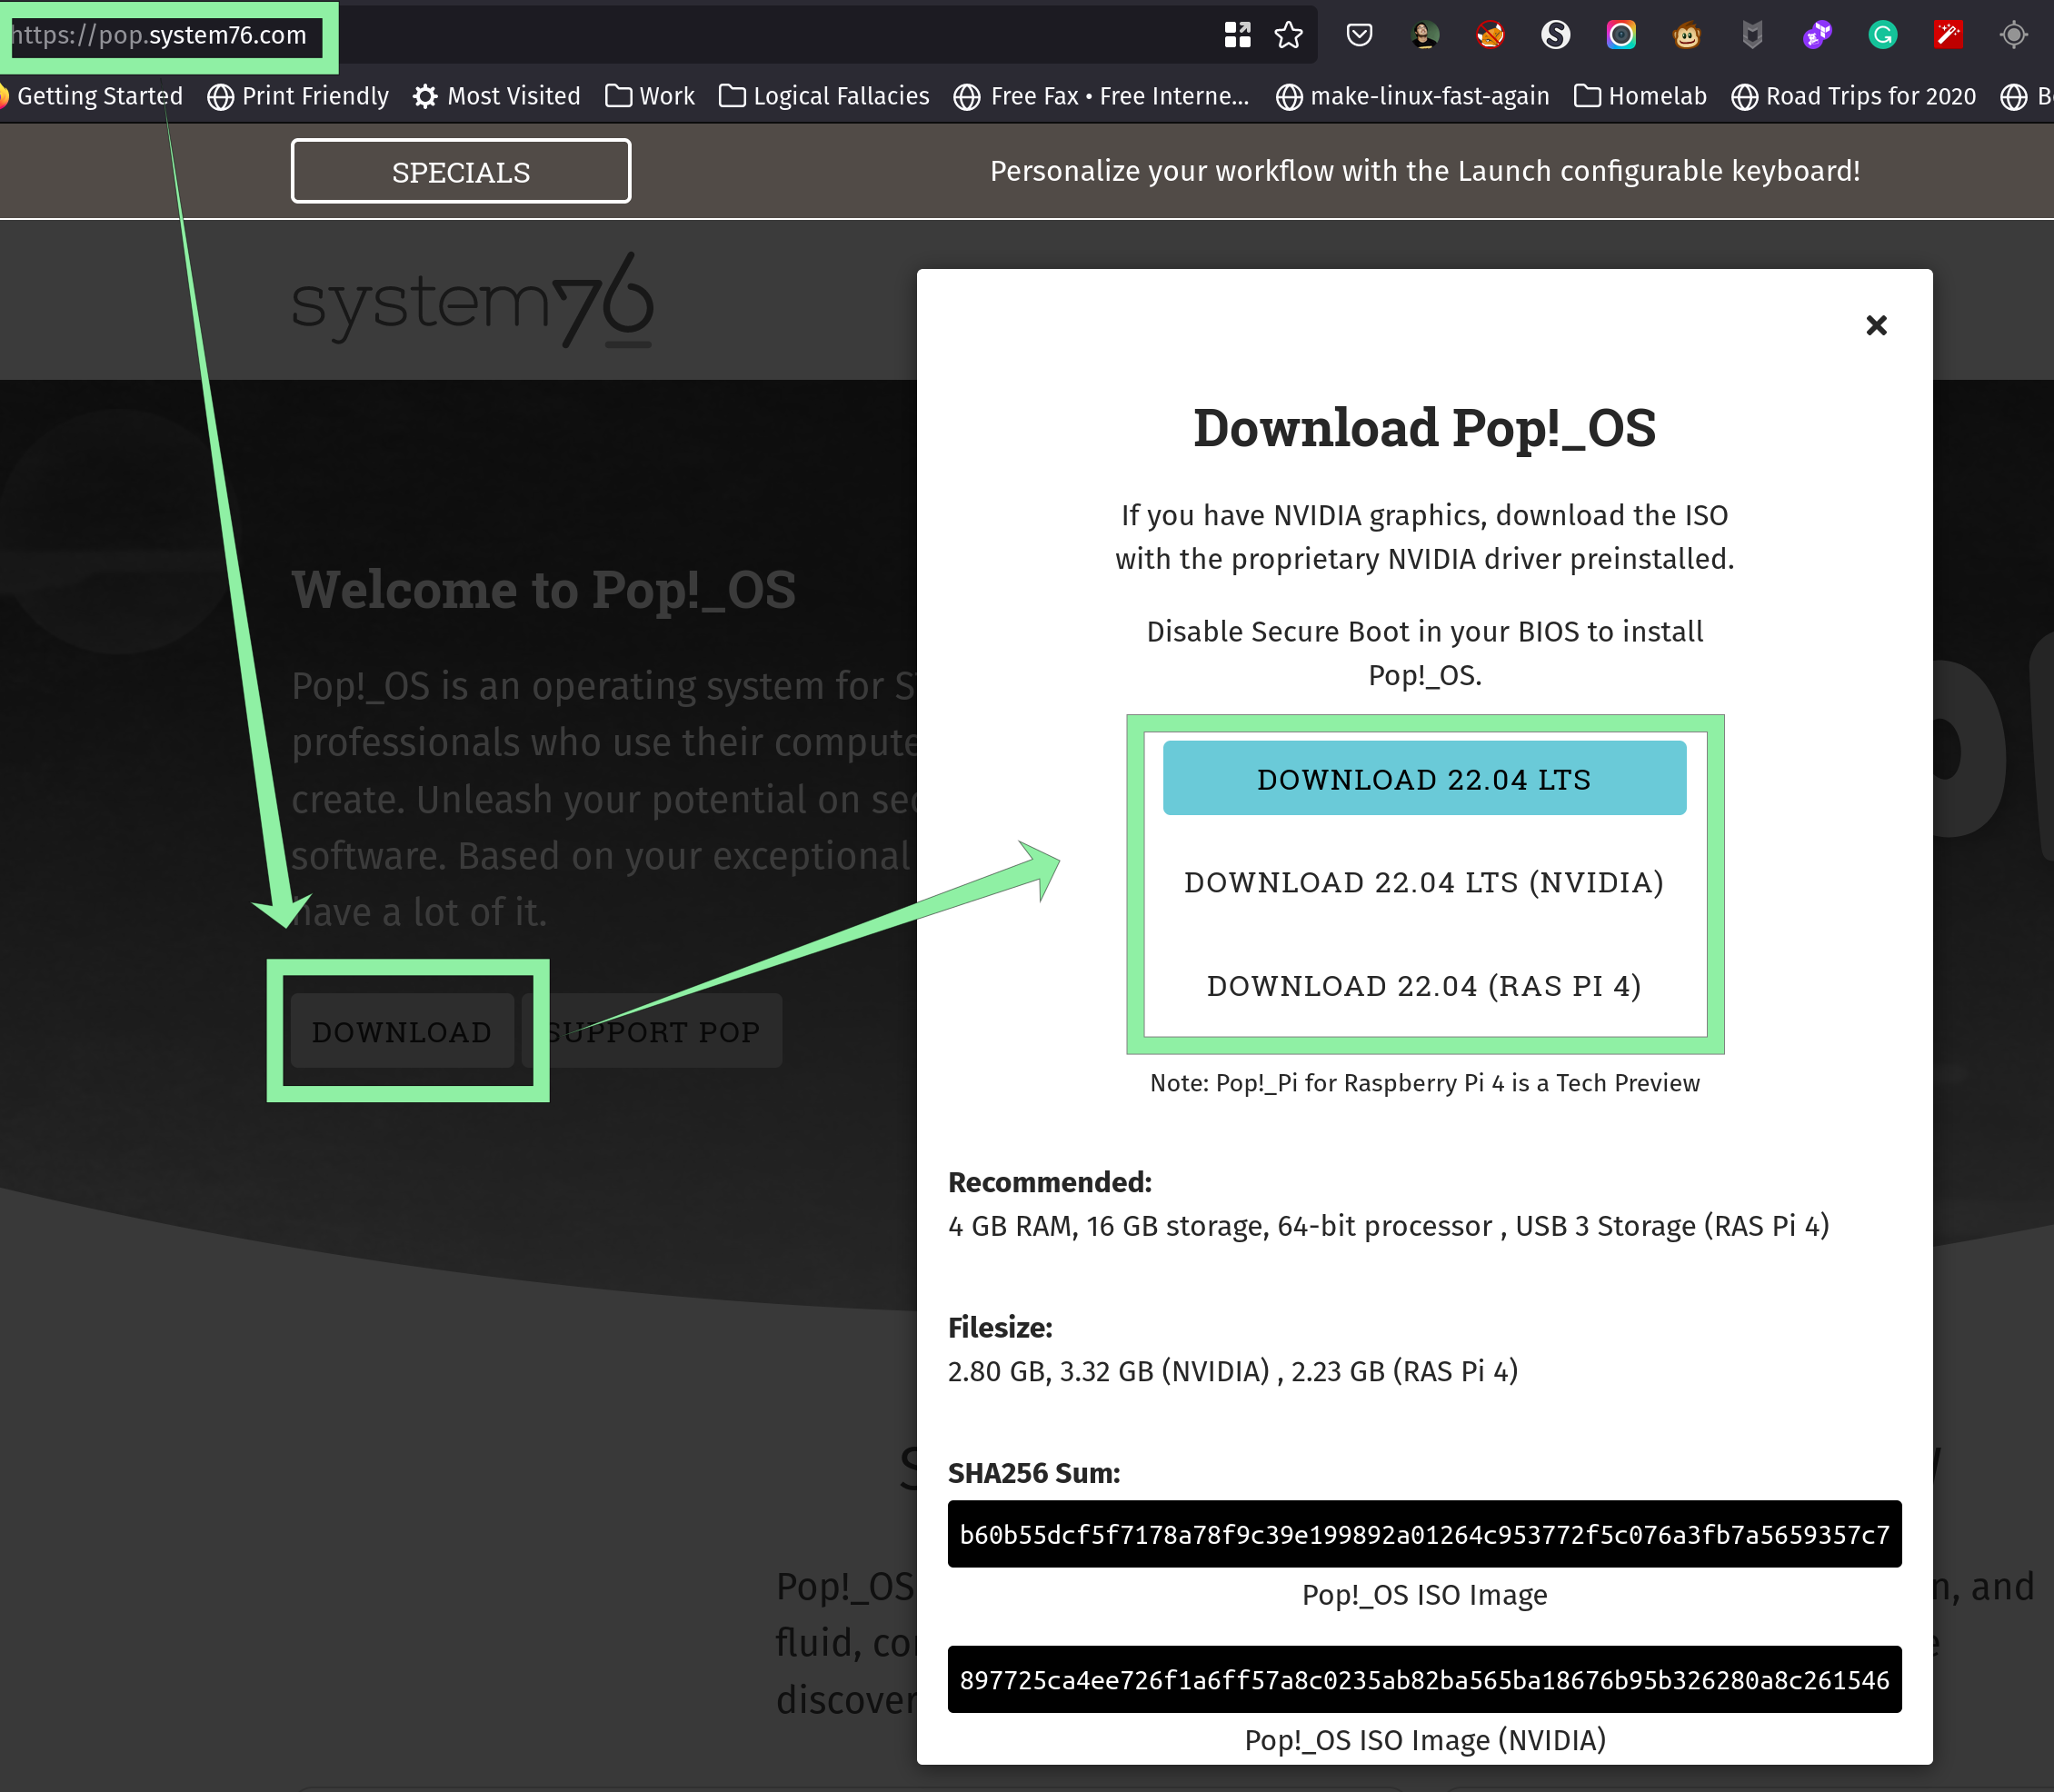
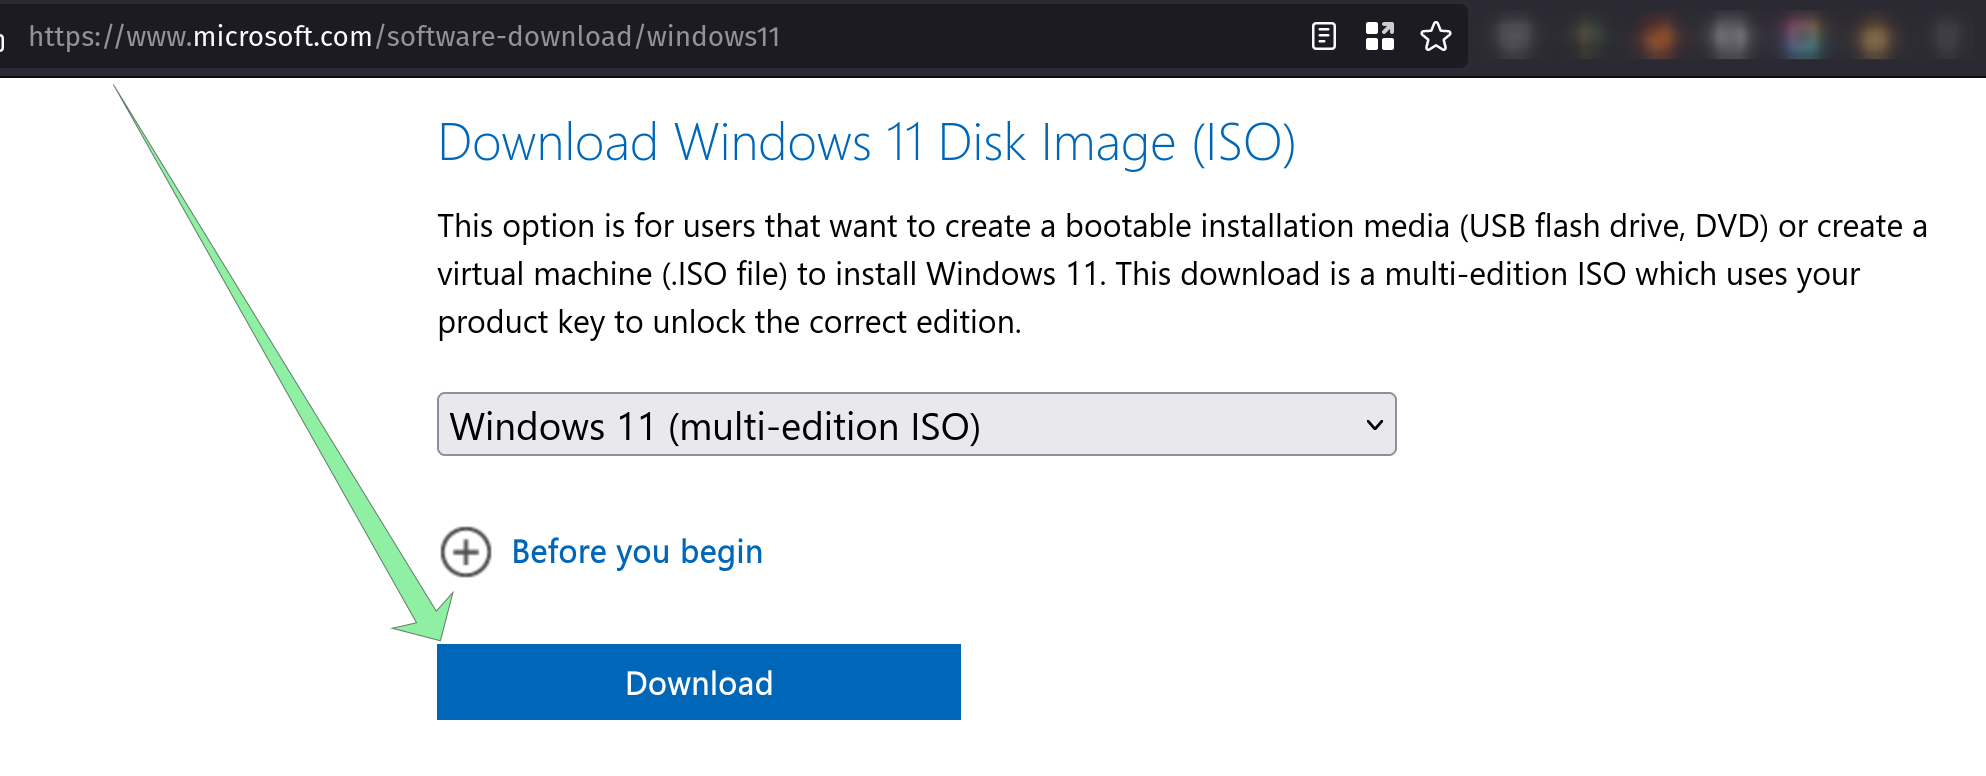
- ISOs:
Setup
Install and configure Ventoy
- Ventoy installation instructions here
- Add
WindowsandPop!_OSISOs to ventoy folder in USB drive
Create partitions first using gparted in live Pop!_OS
- Boot into
Pop!_OSand create 5 partitions:
- The
EFIpartition I recommend you use 512MBFAT32(it is more than necessary) - The
MSRpartition should be 128MB FAT32 will be for Windows - The actual windows installation whatever you want, I recommend more than
100GB
NTFS - The
/bootpartition for linux I recommend 1GBxfs - The
Linux LVMpartition whatever is left of the disk usinglinux pv
Install Windows 11, without encryption
- When choosing partitions press
Shift+F10to opencommand prompt - In Command prompt, run
diskpart - Run
list diskto get a list of disks and their numbers - Run
select disk <number>to switch context to a specific disk - Run
list partitionto get a list of partitions and their numbers, you should see the partitions you created in step1 - Run
select partition <number for EFI> - Run
create partition efi size=512to createefipartition - Run
select partition <number for MSR> - Run
create partition msr size=128to createmsrpartition - Run
exitto go back to windows installation - Make sure windows installer sees EFI and MSR partitions
- Select the partition you created in step
1for windows to be installed on - Install windows, updates, activate etc
Now install Pop!_OS (or Ubuntu)
- Press
Try Demo Modeto get to the desktop - Open terminal
sudo su -fdisk -lto find yourLinux LVMpartitioncryptsetup luksFormat /dev/nvme#n#p#this will encrypt and ask you to setup a passphrasecryptsetup open /dev/nvme#n#p# luks1to decrypt the partition and mount it at/dev/mapper/luks1pvcreate /dev/mapper/luks1to create aPhysical Volumethat LVM can usevgcreate vg_hostname /dev/mapper/luks1(usedvg_thinkpadlast time)lvcreate -L 100G -n lv_root vg_hostname# at least 100 GBlvcreate -L 4G -n lv_swap vg_hostnamelvcreate -l100%FREE -n lv_home vg_hostname- Open the regular installer, choose
custom partitioning - Create
/bootwithout encryption - Select
EFIpartition and mount it at/boot/efi - Decrypt
Linux LVMpartition - Select 100 GB and pick
/for it and format usingxfs - Select 4 GB as swap
- Select last LVM partition for
/homeand format usingxfs - Should look something like this
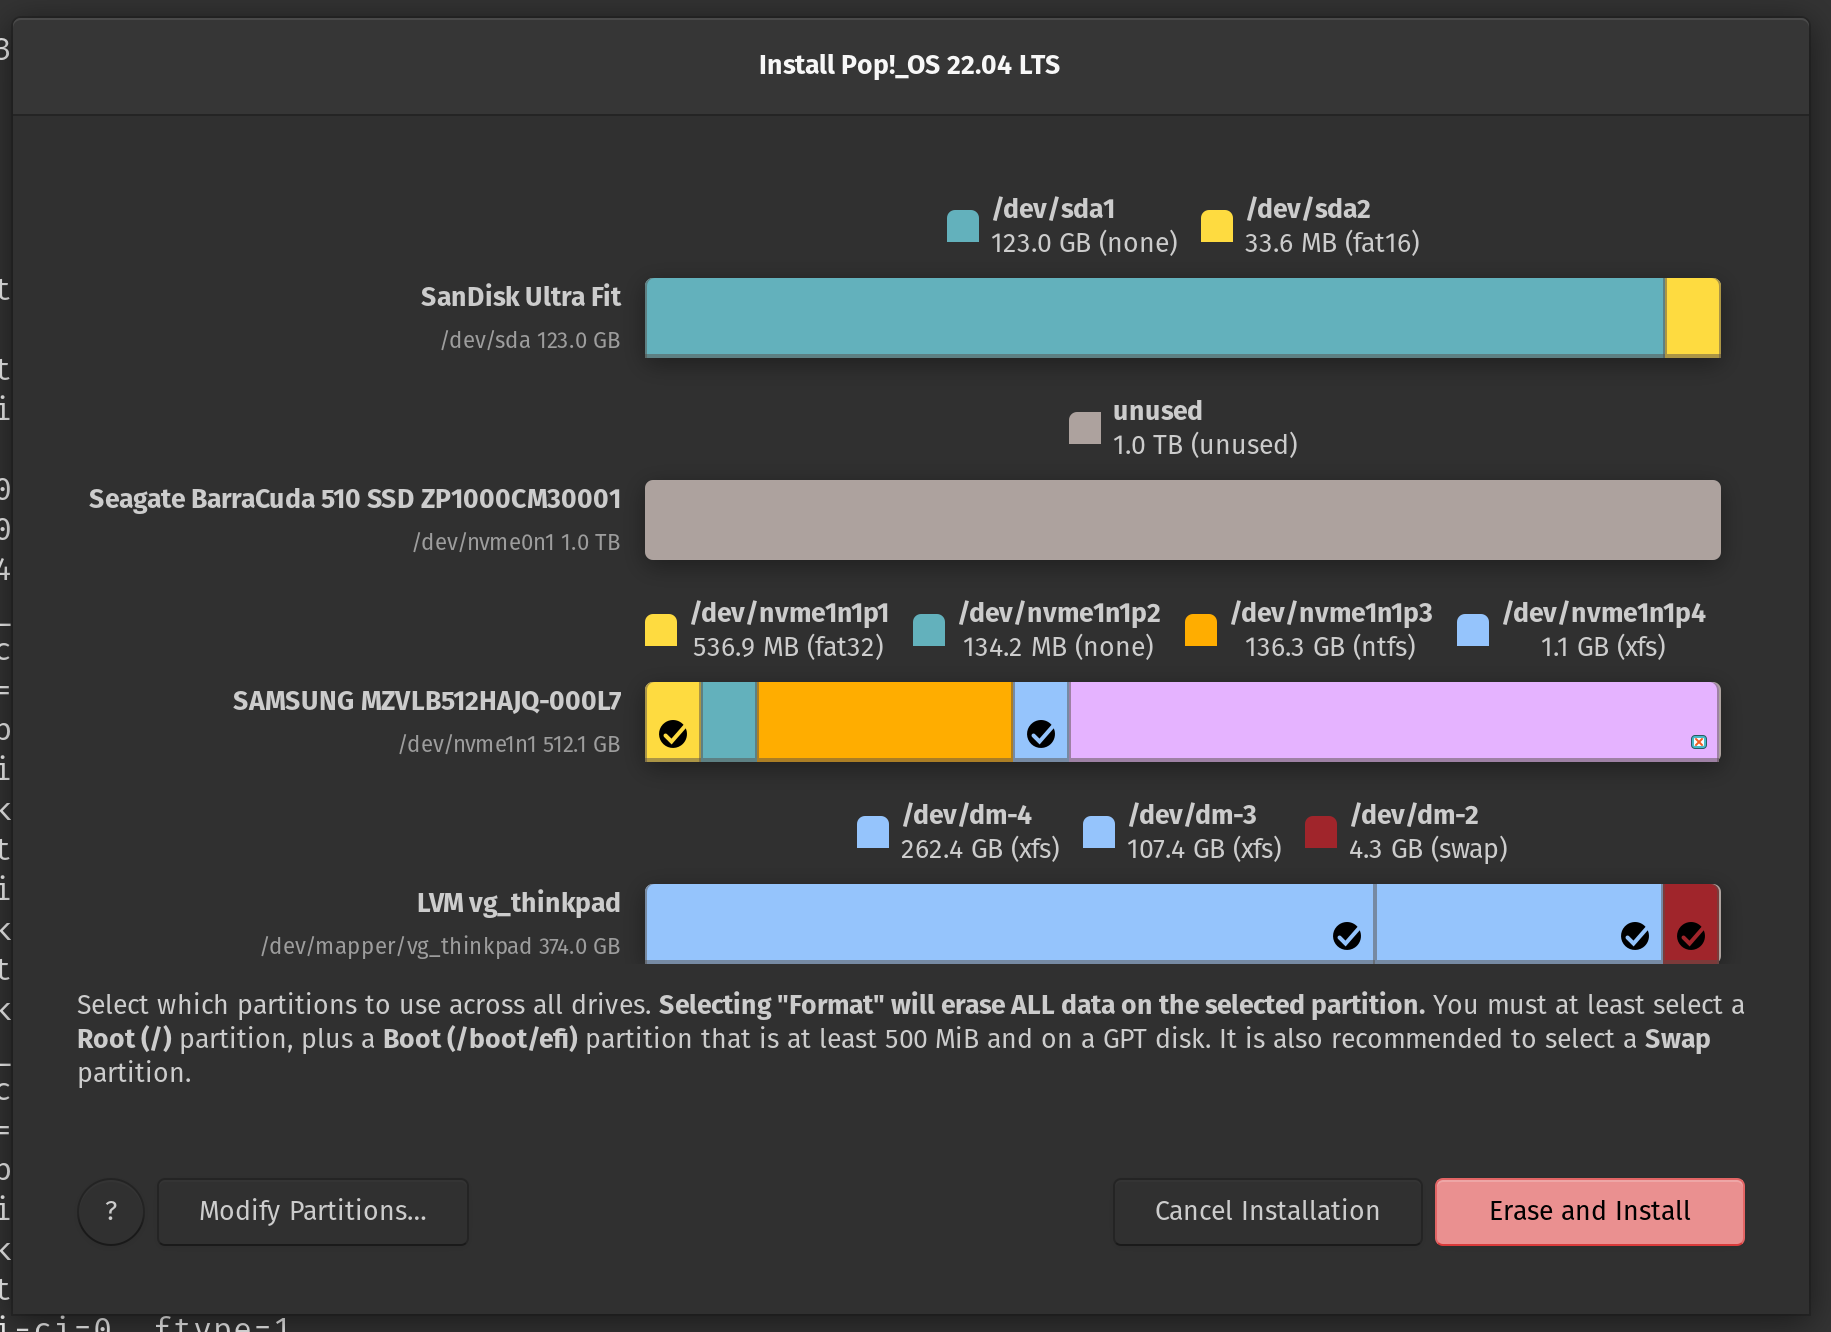
- When the installer finishes, don’t reboot
- Open terminal, again
sudo su -blkid /dev/nvme#n#p#for theLinux LVMpartitioncryptsetup open /dev/nvme#n#p# luks1to decrypt the partitionparted -lsmount /dev/mapper/vg_thinkpad-lv_root /mntChange volume group namemount /dev/mapper/vg_thinkpad-lv_home /mnt/homeChange vg namemount /dev/nvme#n#p# /mnt/bootChange device and partition numbersmount /dev/nvme1n1p1 /mnt/boot/efiChange device and partition numbersfor i in dev dev/pts proc sys run; do mount -B "/${i}" "/mnt/${i}"; donechroot /mnt- We are now inside the installed system, not the live environment
-
cat /etc/crypttabConfirm UUID matched blkid output above# cat /etc/crypttab luks1 UUID=0000000 none luks - if
/etc/crypttabdoes not exist create it -
Next, confirm the
/root partition UUID matches thePop_OSUUID in/boot/efi/EFI/Pop-OS*# grep "$(ls -d /boot/efi/EFI/Pop_OS-* | cut -d '-' -f2-)" /etc/fstab UUID=3333333333 / xfs defaults 0 0 -
Confirm you have
/,/boot,/boot/efi,/homeand swap partitions in/etc/fstab# cat /etc/fstab # /etc/fstab: static file system information. # # Use 'blkid' to print the universally unique identifier for a # device; this may be used with UUID= as a more robust way to name devices # that works even if disks are added and removed. See fstab(5). # # <file system> <mount point> <type> <options> <dump> <pass> PARTUUID=44444 /boot/efi vfat umask=0077 0 0 UUID=55555 /boot xfs defaults 0 0 UUID=666666 /home xfs defaults 0 0 UUID=3333333333 / xfs defaults 0 0 /dev/dm-2 none swap defaults 0 0 - if
swapin/etc/fstabdoes not showUUID, you can obtain it via the command:lsblk -f | grep 'swap', now update swap line in/etc/fstab - As of kernel
5.11.0-40-genericthere’s a ~45-second pause at boot while the system tries to find a non-existent resume device, so we’ll disable resume. -
Create the file
/etc/initramfs-tools/conf.d/noresume.confwith contents:RESUME=none -
If you want to mount
/tmpastmpfs(ramdisk) then:ln -s /usr/share/systemd/tmp.mount /etc/systemd/system/ systemctl enable tmp.mount
Add timeout to UEFI boot loader
Reboot. Spam your spacebar for the menu. Select with arrows, add timeout with “t” or reduce with “T” (+/- also work), select default with “d”. Hold “l” to boot linux after POST or “w” to boot Windows after POST without visiting the menu.
Related links
- Breaking luks encryption
- How to install Ubuntu with LUKS Encryption on LVM - superjamie gist
- How to install Ubuntu encrypted with LUKS with dual-boot
- reddit - Is there a way to Dual boot Pop OS and Windows 10?
- Dual Boot Pop!_OS with Windows using systemd-boot - github.com/spxak1/weywot
- How can I install Ubuntu encrypted with LUKS with dual-boot? - askubuntu
- Full_Disk_Encryption_Howto_2019 - help.ubuntu.com
- Creating logical volumes - RedHat 5 at mit.edu


 .
.